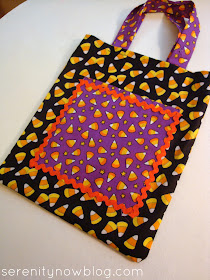
Today brings a tutorial on Homemade Trick or Treat Bags! This is a simple sew tutorial--anyone can do this one:
{I ran this post when I had quite a few less Followers. I thought my new readers might enjoy this one, and my *old* readers would like to know that the bags held up very nicely, and yes, there was room for some candy for moi!}
We've all seen those $1 plastic pumpkin Trick or Treat buckets at Target and Wal-Mart.
 I decided I needed some creative time yesterday, so I sat down while the girls were napping and made a Trick or Treat bag with some Halloween fabric I found in Wal-Mart's fabric department. I had been looking in JoAnn's, but they were pretty picked over, and I fell in love with the candy corn fabric I found at Wally World.
{I ran this post when I had quite a few less Followers. I thought my new readers might enjoy this one, and my *old* readers would like to know that the bags held up very nicely, and yes, there was room for some candy for moi!}
We've all seen those $1 plastic pumpkin Trick or Treat buckets at Target and Wal-Mart.
 I decided I needed some creative time yesterday, so I sat down while the girls were napping and made a Trick or Treat bag with some Halloween fabric I found in Wal-Mart's fabric department. I had been looking in JoAnn's, but they were pretty picked over, and I fell in love with the candy corn fabric I found at Wally World.
I should make a disclaimer here that I am pretty new to sewing. My skill level could be classified as EXTREME beginner, and if you have any sewing experience at all you may just want to skip to the end to see the finished product because my methods might make blood shoot out of your eyes.
I decided I needed to cut out a squarish rectangle thingie (see how precise I am?!) about 12 x 14. I wanted the bag to be roughly 11 x 13, so I figured that would allow for 1/2 inch seams on the sides. I folded my fabric in half and trimmed the bottom so it would be even:

Leaving the top of the purple square open for the pocket, I sewed around the rest of the square, making a very small seam.


I measured a half inch seam on the top of each piece for the opening of the bag, pressing and pinning to make sewing easier.


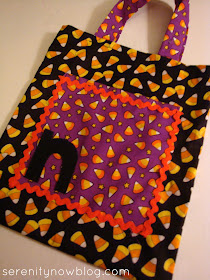
Then I cut a square of a contrasting fabric to go in the middle on the front of the bag as a pocket. I pinned, pressed, and sewed a straight seam across the top of the square first so the pocket would have a finished opening. This, of course, had to go on the "right side" of the fabric since it would be an outside pocket.


Leaving the top of the purple square open for the pocket, I sewed around the rest of the square, making a very small seam.

I used some of the leftover purple candy corn fabric to create some handles for the bag. I just measured and cut two long rectangles that looked like they'd make long enough handles.
I folded the purple rectangles in half with the "wrong side" of the fabric facing out, then pinned them.


Pinned the handles on where I thought they'd look nice. Then I sewed straight across the top, making sure the seam went through the handles and made a nice seam on the top of the bag opening.

After that, I just had to sew around the rest of the bag to pull it all together.


After that, I just had to sew around the rest of the bag to pull it all together.


I used the adhesive to glue some orange rick-rack over the pocket seams on the front of the bag. Very easy to use, doesn't burn your fingers, and dries quickly.

All that was left was to hot glue a stiff, black felt "n" (for "Natalie") to the front of the new bag. Tomorrow, I'll make an "m" bag for Michaela Byrd.
This project took me some time because the girls kept interrupting me after they woke up from their naps, but once I decided on what I was doing, it was really easy.
This project took me some time because the girls kept interrupting me after they woke up from their naps, but once I decided on what I was doing, it was really easy.
This will be so much easier to store than one of those plastic pumpkins, and I got to practice on my sewing machine again. There might even be extra room for some candy for ME on Halloween! *wink*


thanks for reposting-i hadn't seen this-so cute! this would be great for me because then my kids couldn't fight afterwards over whose bag is whose-their initial would be right on it!
ReplyDeleteThis is such a good idea, and your little trick-or-treaters are just adorable! A great entry for the CSI Project. And a great tutorial--you make it look very doable, even for beginning seamstresses.
ReplyDeleteSo cute!!Great job!
ReplyDeleteOh my word...was this a year ago? The older I get, the faster time flies.
ReplyDeleteIt's still really cute!
Those are adorable bags! I think I will use your pattern/tutorial to make little library bags for our boys.
ReplyDeleteThanks for reposting it so those of us who weren't around last year get to drink in your great ideas!
I too am a newer sewer so as far as I am concerned...your tutorial rocks!!!! :-)
So cute {and so are your girls!}, and sure beats the pillow cases we used as kids! *lol*
ReplyDeleteThose bags are too cute! I love how easy bags can be too make. I overthink sewing projects a lot, which keeps me from trying new stuff.
ReplyDeleteFantastic Amanda! You've inspired me to make some of those trick or treat bags for my own kids! Love love love those cute kiddie costumes! You're such a great mom!
ReplyDeletexo
Kate
Those are adorable! I really need to make some of these for my kids! The girls are soooo cute!!! I never would've thought of Tiger Lily! Precious!
ReplyDeleteToo stinking cute! The bags are cute, too ;0 !
ReplyDeleteMy grandma made us bags like this when we were little! So cute! & I think I was Tinkerbell about 3 years in a row (: I'm excited to see pictures of your girls this year in their costumes!
ReplyDeleteAh these are precious! I’m jealous of your sewing skills. Look at all the neat things you can do!
ReplyDeleteSeeing this picture reminds me that I didn’t post a pick of your kiddos in our homemade costume parade. I pulled pics that were in my e-mail inbox and completely forgot to copy the one from your post....whoops. :o)
Hope you don’t hate me ;o)
Kendra
so cute! My little girl was Tinkerbell last year too! Thanks for the great tutorial-
ReplyDeleteHow cute! They are going out in style. I would totaly buy that for trick or treating.
ReplyDeleteWhat an adorable bag!! And I too love the Fabric glue...but many times, it drives me crazy. It comes out of the tube so quickly and then keeps coming and coming and coming! What a mess I can make sometimes.
ReplyDeleteBut the glue itself is fabulous!
Ha!
Hugs
SueAnn
Now that is a cute idea! And your girls are darling in their costumes!
ReplyDeleteThese are adorable and so are your girls! This is something they'll keep and show their own kids that their domesticated, creative, sewing mama made for them! :)
ReplyDeleteVery cute bags!
ReplyDeleteSo cute!
ReplyDelete(I also love the name of your blog!)
Great idea. I am an extreme beginner at sewing myself, so this was a great tutorial :) I can't wait to make these for my little munchkins.
ReplyDeleteI am SO impressed, Amanda! My sewing skill level would be ranked with yours, but I think you lied. ;) These are adorable!
ReplyDeleteWhat an adorable bag! And it can be used each year.
ReplyDelete