Friday, February 28, 2014

Weekend Bloggy Reading :: Link Up!

Welcome to my Weekend Bloggy Reading link party. This is the day of the week where other bloggers stop by to link up their best post of the week here at Serenity Now, and readers get to browse tons of fun project ideas. If you're new here, don't forget to "Follow" or subscribe so you don't miss future parties and projects!

*Don't forget this week's Giveaway for a PetBox full of fun treats and surprises for your pet!*


*Please be sure to read my guidelines before you add a link--I've had to bypass so many great projects lately because they didn't include a link back to my blog in the post!

This party is a great place to showcase your very best post of the week (home decor, crafts, party ideas, recipes, DIY, tips and tricks, etc.) and to see what else is out there. I'm currently on "maternity leave" to enjoy our brand new baby boy, so this party is all about you guys! I will be doing my best to keep up with weekly features until I am "back in the game."

**Also, the Best of the Blogosphere will be up at Centsational Girl sometime today! Kate and I have rounded up some fab DIY to share with you as we kick off a new year full of inspiration. Head over to see the BOTB after you link up here!**


Time to link up your best post of the week!

Wednesday, February 26, 2014

PetBox Review and Giveaway {a fun delivery for your pet}

This post brought to you by PetBox.// As any pet owner who also has kiddos knows, the pups can often feel neglected when a new baby is welcomed into the family and starts receiving extra attention. I like to surprise our dogs with little treats when I can, so it was a pleasure for me to review a PetBox and offer one as a Giveaway for one lucky Serenity Now reader. Keep reading to find out more about PetBox and to enter to win one for your special furry friend!

PetBox is a monthly subscription delivery service (with free shipping!) that sends your dog or cat a personalized box of fun and healthy goodies. You can "pack" the box yourself online or allow the folks at PetBox to pack your box for you, which is the option I chose.

It's as simple as:

Choose a plan to fit your budget, tell them about your pet, and pack your box (or let them choose).

I like surprises, so I decided to let PetBox send whatever they thought would be a good fit. I wondered how they'd be able to please two very different dogs. Emma is a twelve year old Pomeranian and Ellie is a 1 year old German Shepherd. They don't have a lot in common. Case in point:


The PetBox arrived promptly, and I took a peek to get photos before we let the dogs inspect everything. I was so excited to see some really neat things...stuff both dogs could enjoy!

Several different yummy treats, a tooth brushing set, a rawhide (Ellie's favorite!), and a de-shedding tool.

It was cute to see the dogs get all excited when the box arrived. Ellie seemed to know there was something for her inside. We took a quick little video of her exploring--turn your volume up and please disregard the unvacuumed floor (you'll have to click over to the blog to view the video if you're reading this post in a reader or email):


 Yep, they were pretty excited! Emma wanted a treat and Ellie went straight for the rawhide.

We were really pleased with our PetBox experience. I think it would be fun to browse the products and choose our own, but I also really liked the surprise element of letting them pick things for us. They did not disappoint!

To learn more about PetBox or to sign up you can visit their site, or connect with them via Facebook and Twitter!

One reader is going to win his/her own PetBox this week!

--UPDATE: GIVEAWAY NOW CLOSED--

Please use the rafflecopter widget below to enter, and be sure to note the terms and conditions.

a Rafflecopter giveaway

Good luck!

Disclaimer: I received a PetBox in exchange for an honest review. I was not financially compensated for this post, and all opinions expressed are (as always) 100% my own.

Tuesday, February 25, 2014

How to Build a Framed Chalkboard {DIY Tutorial}

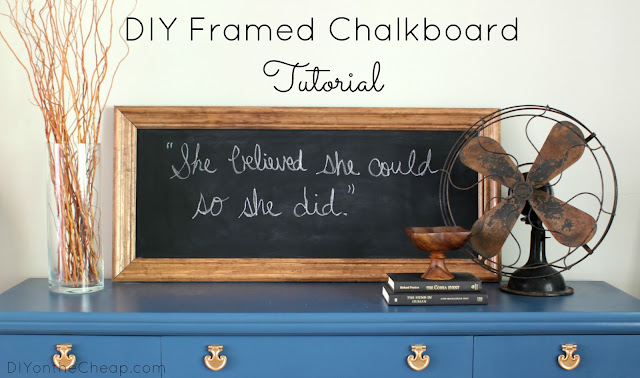
I've been wishing I was handier. I love clicking around the blogosphere and seeing beautiful handmade pieces. My friend Erin from DIY on the Cheap is one of those talented bloggers. She's here today to show us How to Build a Framed Chalkboard. Keep reading for her tutorial!

***********************

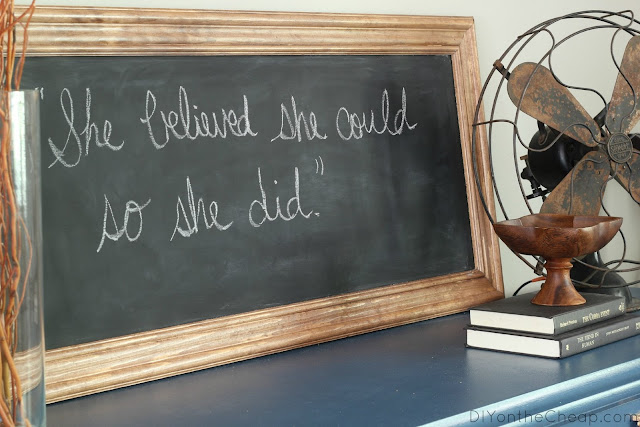
Hello, Serenity Now readers! I'm so happy to be guest posting for Amanda today. I'd like to share a tutorial with you for how to build a framed chalkboard, which is a relatively easy beginner woodworking project. If you are looking to explore working with power tools, this would be a great project for you! However, power tools are not required. You could always use a regular saw and miter box instead.

Here's what you'll need:
  • Wood for the chalkboard in any size you choose. I used a leftover scrap of hardwood plywood. (My chalkboard size is 19"x42" because that's what I had on hand.)
  • Door Frame Moulding
  • Spray primer
  • Chalkboard spray paint
  • Sander
  • Miter Saw (or regular saw with a miter box)
  • Brad Nailer (or good old fashioned hammer and nails)
  • 18 GA 5/8" brad nails (if you're using a brad nailer)
  • Staining cloths
  • Stain in your choice of color (I used American Walnut)
  • Sealer (I used Polycrylic)
  • Paint brush

Step 1 Cut your board down to the desired dimensions. The home improvement store will do this for you if you give them your measurements, or you can do it yourself. I used a scrap of leftover plywood and just left it "as is." Sand it smooth.


Step 2 Spray the wood with a coat of primer, and then spray with 2-3 coats of Chalkboard Spraypaint.


Step 3 Measure and cut your moulding for the frame using a miter saw (or saw and miter box). Use 45 degree miter cuts to form the corners.

Step 4 Stain your frame. I used a pre-conditioner and then applied one coat of American Walnut stain, and added a topcoat of Polycrylic.


Step 5 Attach your frame to the chalkboard using wood glue and a brad nailer. (Or hammer and nails.)


Step 6 Lean or hang your chalkboard. I opted to lean mine against the wall, but you can also add D-rings and hang it. Another option is to add thin moulding around the edges to hide the raw edge of your wood. I chose not to do this since it isn't noticeable where I placed it in my home.


I love that I'm able to change out the message on my chalkboard depending on the season or occasion. You could of course customize this by making it any size you choose, and using any finish you'd like on the frame (paint, colored stain, etc.). I get bored easily, so I like that I can instantly change the "art" in the room by erasing the chalkboard and drawing or writing something new.


Thanks so much, Amanda, for letting me share this project with your Serenity Now readers!

 *****************

Thanks, Erin! You've inspired me to try something handy. I have a love affair with great quotes and Bible verses, so this is right up my alley!

If you enjoyed this post or found it helpful, I hope you'll click your "Pin It" button to add this post to Pinterest, or a +1 for Google+. And I always appreciate kind comments.

Follow on Bloglovin

Monday, February 24, 2014

Inspiring Project Ideas {link party features}

Ahoy, Monday. It's so much fun to start the week off with creative inspiration, and today I'll be sharing some Features from the weekend link party. If you're new to the blog, I take a couple of days each week to let other bloggers showcase their project ideas here, and I take a day to feature a few of my faves. We have crafts, home decor, DIY, recipes, party ideas, organizing, tips and tricks, seasonal projects, and more!

Here are some projects that caught my eye this week:

~Kitchen Reveal via Everyday Enchanting
Kitchen Reveal


~Living Room Makeover via Soul Style
Living Room Makeover

~Mars Chocolate Brownie Cookies via TitiCrafty by Camila
Mars Chocolate Brownie Cookies

Sunday, February 23, 2014

Showcase YOUR Best Post of the Week!

Have you enjoyed your weekend so far? I'd love to see you at this week's Weekend Bloggy Reading link party. Hop on over to showcase your creativity if you're a blogger. Not a blogger? Don't miss all the cool "Pinable" projects! Today's the last day...it ends at 10 pm EST tonight!

If you haven't joined the fun yet, please hop over to the party and add your best post of the week. We have Home Decor, Crafts, DIY, Recipes, Tips and Tricks, Party Ideas, and so much more! Lots of fun ideas to Pin and tuck away for future use. Over 100 linked up so far!

If you've already linked up, be sure to browse some of the other projects. If you haven't added a link back to me within your post, please take a minute to do that if you'd like your project considered for a feature. It's good for both of our SEO, guys!

Hope you have a fantastic weekend.

Follow on Bloglovin

Friday, February 21, 2014

Weekend Bloggy Reading :: Link Up!

Finally, Friday! Welcome to my Weekend Bloggy Reading link party. This is the day of the week where other bloggers stop by to link up their best post of the week here at Serenity Now, and readers get to browse tons of fun project ideas. If you're new here, don't forget to "Follow" or subscribe so you don't miss future parties and projects!

*Please be sure to read my guidelines before you add a link--I've had to bypass so many great projects lately because they didn't include a link back to my blog in the post!

This party is a great place to showcase your very best post of the week (home decor, crafts, party ideas, recipes, DIY, tips and tricks, etc.) and to see what else is out there. I'm currently on "maternity leave" to enjoy our new baby boy, so this party is all about you guys! I will be doing my best to keep up with weekly features until I am "back in the game."

Time to link up your best post of the week!

Thursday, February 20, 2014

Supply Organizer (a DIY Upcycle Makeover)

Jen from Girl in the Garage is here with a very clever little upcycle project to share. We spend a lot of time in the New Year organizing, downsizing, upcycling, enjoying a fresh home. Jen's post was a fantastic reminder to me to take a fresh look at things around my home. You never know when you can find a new use for something. This Supply Organizer (a DIY Upcycle Makeover) could have so many uses!

****************************

Hi, I'm Jen from Girl in the Garage and I want to thank Amanda for letting me share this project with you today! I'm a busy mom of two preschoolers, and when I get some free time here and there I like to spend it being creative. On my blog I share awesome furniture makeovers, DIY home decor, crafts, and tidbits of my family life. Today I'm showing how I upcycled a dirty garage organizer.


This organizer is the kind of thing I see often at yard sales, except they're usually cracked somewhere or missing a drawer or two. Even if you saw one in decent condition you probably wouldn't consider buying it unless you really needed a place to store a bunch of nails and screws.

Well, I saw this one in near-perfect condition (except for being dirty) and envisioned a better life for it than just holding hardware in someone's garage. Then, as usual- I let it sit in my garage for a couple months until I knew exactly what I wanted to do with it. Hey, sometimes inspiration happens immediately and sometimes it takes awhile!

This is what it looked like when I bought it (minus the paint splatter, which was courtesy of another one of my projects. Oops!):

I took the drawers out and cleaned it all up. Then I took the case outside and painted it with black Rustoleum spray paint.

I went through my stash of scrapbook paper and picked out three sheets that coordinated. I cut out six pieces from each sheet to fill the drawer fronts. Since the front of the drawer wouldn't be see-through anymore, I thought it would be good to number each one. Otherwise it might be maddening to search through 18 different drawers to find what you need!

I used Wide Latin for the font in Microsoft Word and printed the numbers on off-white card stock.

After lots of cutting, I laid out the papers and numbers for each drawer.


Then I used Mod Podge and a thin paintbrush to glue the numbers to the scrapbook paper. When that was done, I spread a thin line of Mod Podge across the top and sides on the front of the paper and slid it into the drawers, pressing for about 30 seconds.


When all 18 drawers were done I slid them back into the case. Now I have an organizer for trinkets... or jewelry... or keys and miscellaneous items by the front door... or...?


It would also be good for craft storage; buttons, thread, beads, washi tape...


I bought this owl on a recent trip to Anthropologie - it's actually one half of a salt and pepper shaker set but I got it on clearance because the other owl was missing. Lucky me!


I love this paper; I'm a sucker for anything with a French or vintage theme. (French and vintage? LOVE LOVE LOVE!)

Do you enjoy repurposing too, or just like to see before/after makeovers?
I've done many more furniture makeovers and DIY decor - click HERE to see more.
I'd love for you to visit my blog Girl in the Garage so we can keep in touch.
Thanks again, Amanda!
Jen
FB Twitter Pinterest RSS Instagram

*************************

Thanks, Jen, for the reminder that sometimes those forgotten items we have laying around can be made beautiful (and useful!) again!

If you enjoyed this post or found it helpful, I hope you'll click your "Pin It" button to add this post to Pinterest, or a +1 for Google+. And I always appreciate kind comments.

Follow on Bloglovin

Wednesday, February 19, 2014

DIY Doodle Picture Frame

I am just thrilled to welcome Beckie from Infarrantly Creative to the blog today. She has a cute craft tutorial to show off; a DIY Doodle Picture Frame. Beckie was my roommate at the Haven Conference two summers ago, and she was so sweet to put up with me while I stressed about a sick kiddo at home. Beckie is one of those people who can create the most amazing projects out of the most unlikely supplies...old cribs, office supplies, you name it. Please help me welcome Beckie to the blog!

*****************************

Hello, Serenity Now readers.  This is Beckie from Infarrantly Creative. Amanda and I go waaaaay back - at least 4 years ago. She is one of the sweetest bloggers I know and seriously has the best reputation among us. It is a honor to help her out while she adjusts to life with this little one.

Today I am showing you a fun little Doodle Frame.  It would be fun for kids, tweens or teens. Instead of texting, instagramming, snapchatting or whatever else they are into they can spend some time doodling on this frame. I know me and I would have written I love {insert flavor of the week} all over the frame in my tween years. Bwhahaha!

When you are done with the doodle you tear it off to reveal a new piece of paper to doodle on.  
doodle frame Supplies: Notepad of Paper
Utility Knife (I got mine at the Dollar Tree)
Double-sided stick tape
A 4” x 6” old frame with back on it
Scrap of matt board
White glue (I used Mod Podge)
Foam brush or small paint brush
Straight Edge
Ruler
Binder Clips
Marker

1.  Find a pad of paper that you are willing to part with that is at least the size of a notebook page.  I got mine during school supply season.
notebook paper

2.  Using a ruler, mark a 3 1/2” by 5 1/2” rectangle that is 2” from the right hand side of the paper since we want our frame to be 2” all the way around.
DSC05417_thumb
DSC05416[2]


3. Next, using a utility knife with a new blade and the straight edge cut out the rectangle. You will have to slice through it firmly over and over until you cut through the amount of pages you want. Make sure you don’t cut past the lines. I wanted 25 pages so I cut through 30 pages so I had some extra pages to work with later.
cutting-out-paper-for-frame
doodle-frame


4. Now, measure more lines 2” from the other lines you made all the way around the frame. Since my binding is on the left side of the notepad I cut out the top and bottom first (the same way I cut out the rectangle) and then I cut out the left side. You should not have to cut through the right side since we measured 2” from that spot to begin with. Now you have your frame.
notebook-paper-frame


5. Using a white glue and binder clips to hold it in place, spread glue on the edge. I wanted my frame to hang vertically so I put glue on the top. Start on the left side and glue it, then put a binder clip in place. Then put a little more glue on, and then another clip and so on and so forth. This will create a tear-off pad. Let it dry.
binder-clips-on-doodble-frame


6. After it is dry, remove one binder clip at a time and reglue and put the binder clip in place again. Then remove the next binder clip, and glue and continue on until you put a second coat on.  I did three coats altogether.

7. While the glue is drying, cut out a piece of matt board (with the straight edge and utility knife) or stiff cardboard the size of your frame. Mine was 7 1/2” by 9 1/"2”. Then using double-sided stick tape, tape the top of the paper pad frame to the top of the matt board.

8. Next, take an old backing from a frame and tape it in place using the double-sided stick tape. Line up the bottom of the frame, thing-a-ma-bob with the bottom of the matt board. (See where I am pointing).
back-of-frame
back-of-doodle-frame writing-on-frame


9. Tape a picture in place under the pad of paper. You will probably remove the first paper since it was the one you drew your lines on. Then doodle away.
doodle frame-vintage-sheet-skirt

When you are sick of that doodle rip off the page and start fresh.
doodle frame 2-vintage-sheet-skirt
This would be cute packaged with some crayons or colored pencils for the artist you have to buy for. I am guessing it would cost less than $3 to buy a notepad, a utility knife and a frame from the Dollar Tree. Hopefully, you have Elmer’s glue, binder clips, a small paint brush, straight edge and cardboard. 

************************

Thanks, Beckie! I know my eight year old and her friends would get a huge kick out of this. What a neat party favor idea too!

If you enjoyed this post or found it helpful, I hope you'll click your "Pin It" button to add this post to Pinterest, or a +1 for Google+. And I always appreciate kind comments.


Follow on Bloglovin
Related Posts Plugin for WordPress, Blogger...